I have been getting a lot of use out of the new version of JDeveloper 10.1.3. So far I feel Oracle has achieved their goals of improving the IDE and beef up refactoring and modeling capabilities. As someone who generally stays away from non-production releases, I have found myself using both 10.1.2 and 10.1.3.
I have always struggled with the modeling features in 10.1.2. They just didn't seem to perform everything I wanted them to do. I am now using the modeling features of 10.1.3 to get past many of the limitations I was seeing. I still have all of my production code in version 10.1.2 but my diagrams are in 10.1.3. I am accomplishing this by setting path settings in my 10.1.3 modeling project to include the source paths of my 10.1.2 model, view and testing projects.
As mentioned, I have a model, view and test project in 10.1.2. This is the actual code that will be deployed to our production servers. My directory structure looks simiar to the following:
c:\projects\MyProject
c:\projects\MyProject\Model
c:\projects\MyProject\ViewController
c:\projects\MyProject\Test
In c:\projects\MyProject resides my workspace file for the 10.1.2 projects. I have also created another workspace in c:\projects\MyProject that is used by 10.1.3. I have created a project named ArchitectureDiagrams in the directory:
c:\projects\MyProject\ArchitectureDiagrams
In my ArchitectureDiagrams project (10.1.3), I open the project settings and add the model, view, and test project source paths to the Java Content settings. After I have done that, JDeveloper 10.1.3 with it's dynamic directory structures automattically pulls in the files from the other projects.
Once I have completed these steps, I can start leveraging 10.1.3 features. Specifically, I am creating use-case and activity diagrams. I am creating class diagrams by simplying dragging and dropping classes onto the diagram. This is great help in keeping my diagrams in sync with my code. Finally, I can also actually open the java files that I created in 10.1.2 and use the additional features of 10.1.3 such as refactoring and code development features.
I do swap between the two different version of JDeveloper and whenever I make a change to a java file in 10.1.3, I make sure the code is still working as I will be deploying and testing using JDeveloper 10.1.2. This approach has allowed me to use the new features of JDeveloper and not lock me into using a tool that is not production release. Although I really don't want to loose my diagrams, I at least will be able to always get support for my production code in case I need it.
Sunday, December 11, 2005
Tuesday, November 29, 2005
Confirm Delete with JHeadstart
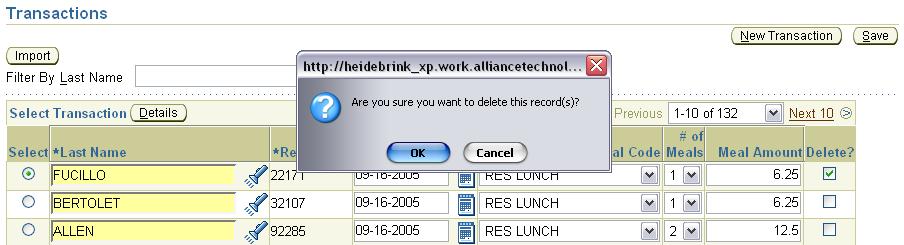
Before you allow a user to delete a record you may want to prompt the user to verify the delete action before continuing. This confirm delete functionality is not built-in to JHeadstart but can be added with the help of Javascript. If you are wanting this functionality on a form layout, you can look at this thread to see the code changes you need to make. If you are wanting to add this to table layout, I will detail what I did to accomplish this.
When you create a JHeadstart project, many files are automattically added to your project. One of those files is form.js which is a Javascript file. Open this file as it is where we'll be adding our Javascript code. This file is located in /jheadstart directory of the project.
Before I detail the code I added, there is a very helpful tip I found when using this file. If you want to see Javascript debug messages while testing your code, all you need to do is set the debug flag to true in form.js.
Update Form.js
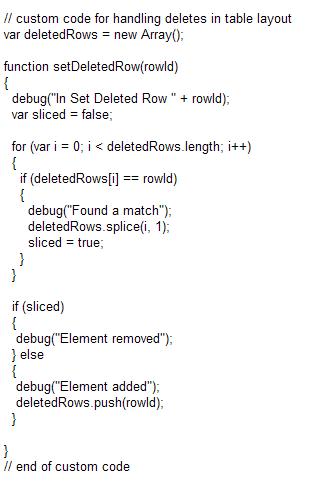
Now, back to the task at hand which is adding confirm delete functionality to your table layout. Add the following code to form.js:
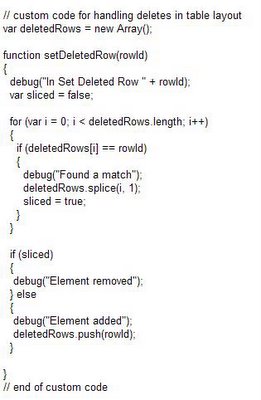
The deletedRows array is used to track what rows have been selected for deletion. The setDeletedRow function is used to add and remove elements from this array. If there is nothing in the array, then the user didn't select anything otherwise we'll know we need to prompt the user.
That is all the changes we need to make to form.js. The other changes we'll need to make directly to our UIX pages. We'll be adding additional Javascript and onClick events to the Save button and checkboxes.
Add Javascript
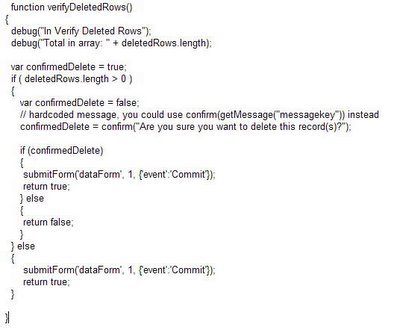
We'll need to add a Javascript function to the UIX page to handle clicking on the Save button. Following is the code to be added:
Add checkbox onClick event
Select the checkbox in the design editor. Open the property inspector and add the following to the onClick event:
setDeletedRow(${uix.current.PrimaryKeyId});
You'll need to replace PrimaryKeyId with a unique value from your VO. This id is added or removed from the Javascript array and is how the system can determine if at least one row has been checked.
Change Save button
By default, JHeadstart generates a Save button similar to the following:
We'll need to change that so that it calls our Javascript code we added above. Following is the new updated Save buton:
Run the app
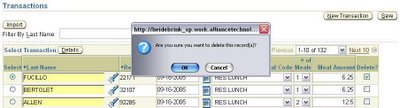
After you get those steps completed successfully, you should see something like this when you execute your program:
Last note, make sure to follow this to ensure you document your post generation changes so that you can continue to generate your app. You can also specify at a page level in JHS which page(s) for the generator to ignore.
When you create a JHeadstart project, many files are automattically added to your project. One of those files is form.js which is a Javascript file. Open this file as it is where we'll be adding our Javascript code. This file is located in /jheadstart directory of the project.
Before I detail the code I added, there is a very helpful tip I found when using this file. If you want to see Javascript debug messages while testing your code, all you need to do is set the debug flag to true in form.js.
var debugMode = true;
Update Form.js
Now, back to the task at hand which is adding confirm delete functionality to your table layout. Add the following code to form.js:
The deletedRows array is used to track what rows have been selected for deletion. The setDeletedRow function is used to add and remove elements from this array. If there is nothing in the array, then the user didn't select anything otherwise we'll know we need to prompt the user.
That is all the changes we need to make to form.js. The other changes we'll need to make directly to our UIX pages. We'll be adding additional Javascript and onClick events to the Save button and checkboxes.
Add Javascript
We'll need to add a Javascript function to the UIX page to handle clicking on the Save button. Following is the code to be added:

Add checkbox onClick event
Select the checkbox in the design editor. Open the property inspector and add the following to the onClick event:
setDeletedRow(${uix.current.PrimaryKeyId});
You'll need to replace PrimaryKeyId with a unique value from your VO. This id is added or removed from the Javascript array and is how the system can determine if at least one row has been checked.
Change Save button
By default, JHeadstart generates a Save button similar to the following:
<submitbutton onclick="verifyDeletedRows();" event="Commit" formname="dataForm" textandaccesskey="${nls.WHATEVER}";>
We'll need to change that so that it calls our Javascript code we added above. Following is the new updated Save buton:
<button onclick="return verifyDeletedRows();" textandaccesskey="${nls.WHATEVER}">
Run the app
After you get those steps completed successfully, you should see something like this when you execute your program:
Last note, make sure to follow this to ensure you document your post generation changes so that you can continue to generate your app. You can also specify at a page level in JHS which page(s) for the generator to ignore.
Partial Page Rendering using JHeadstart and UIX
I am currently working on a project that requires an amount field to be calculated based upon values set by the user. In this particular instance, there is a type field, quantity field, and an amount field. Based on what the user selects for type and quantity, I needed the amount to automatically be calculated by the system. Additionally, I needed to allow the user to override this calculated value if necessary.
As the user makes changes to either the type or quantity field, I also wanted the system to perform the update without refreshing the entire page as this is a web application. I wanted this calculation to happen in either table layout or form layout. I was able to meet all of these requirements using JHeadstart and Partial Page Rendering functionality in JDeveloper.
Following are "partial" steps to set this up. I say partial because these steps are only if you are needing the change to fire based on one field change instead of two (as in my scenario). I have also created an example based upon the SCOTT schema that I can send anyone. Drop me a line at heidebrinks@alliancechnologies.net and I'll send it to you.
All of these steps are completed AFTER your application has been generated using JHeadstart 10.1.2.
Just let me know if you want the example application I developed. It should be helpful if you are trying to implement similar functionality.
As the user makes changes to either the type or quantity field, I also wanted the system to perform the update without refreshing the entire page as this is a web application. I wanted this calculation to happen in either table layout or form layout. I was able to meet all of these requirements using JHeadstart and Partial Page Rendering functionality in JDeveloper.
Following are "partial" steps to set this up. I say partial because these steps are only if you are needing the change to fire based on one field change instead of two (as in my scenario). I have also created an example based upon the SCOTT schema that I can send anyone. Drop me a line at heidebrinks@alliancechnologies.net and I'll send it to you.
All of these steps are completed AFTER your application has been generated using JHeadstart 10.1.2.
- Create a new struts action that extends JhsDataAction and add a method to handle the event.
- We'll want this struts action to work for both table and form layout. Add code to this method to grab the currently "changed" row. The "layoutType" and "rowIndex" parameters we'll be setting in a later step.
- Add code to the "onWhenValChanged" method to execute the necessary business rule(s). This code is best maintained in the business services layer and simply called from here.
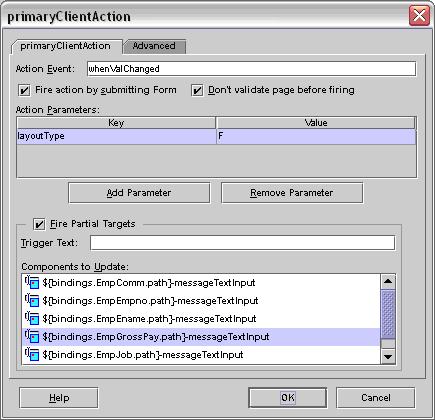
- Open the UIX page that is in form layout. Using the design editor, select the field you are wanting to fire the change. With the field selected, open the Property Inspector and select "primaryClientAction". The following image is an example. Notice the use of the "layoutType" parameter. Set this to "F" to indicate form. The "Action Event" property is set to "whenValChanged" which will call our method "onWhenValChanged" in the JhsDataAction we created.
- Open the UIX page that is in table layout. Using the design editor, select the field you are wanting to fire the change. With the field selected, open the Property Inspector and select "primaryClientAction". The following image is an example. Notice the use of "layoutType" and "rowIndex" parameter. The "rowIndex" parameter is used by the JhsDataAction to determine which row is being changed by the user in the table layout.
- For the page that is in table layout ONLY, open the source editor. Update multiRowUpdateEvent to include the new event you are creating.
formValue name="multiRowUpdateEvent"
value="whenValChanged" - Update struts config so that both actions for the form and table use the new JhsDataAction.
public void onWhenValChanged(DataActionContext ctx) {
}
public void onWhenValChanged(DataActionContext ctx) {

  // layout type will determine how we access the row
   String layoutTypeParam = ctx.getHttpServletRequest().getParameter("layoutType");

   Row row;

   if (layoutTypeParam.equalsIgnoreCase("T")) {
       // since this is table layout, we need to get the row index to know which one
       String rowIndexParam = ctx.getHttpServletRequest().getParameter("rowIndex");
       row = ctx.getBindingContainer()
                .findIteratorBinding("EmpIterator")
                .getNavigatableRowIterator().getRowAtRangeIndex(Integer.parseInt(
                   rowIndexParam));
   } else {
       row = ctx.getBindingContainer()
                .findIteratorBinding("EmpIterator")
                .getNavigatableRowIterator().getCurrentRow();
   }
}


Just let me know if you want the example application I developed. It should be helpful if you are trying to implement similar functionality.
Sunday, September 25, 2005
JHeadstart with Jasper Reports
I am currently developing an application using JHeadstart and JasperReports. I am able to leverage the powers of JHS to generate the parameter forms for me. Using JHS makes it conventient as drop downs, LOV, etc can all be used in the parameter forms. Following hopefully will help anyone who is trying to do the same.
Writing the Reports
We used iReport to create the reports. This tool provides a nice GUI for generating the report files. When creating parameters for your reports, you should use the same naming convention as used by Oracle ADF. As an example, if you have a database column with the name of EMPLOYEE_NAME, ADF would generate the name EmployeeName. Thus, you should name your paramers in Jasper the same way. This will make the ADF components you developed consistent and making passing the parameters to Jasper considerably easier. When you create parameters in Jasper, you need to specify the datatypes. I went ahead and declared all of my dates as String and then in the SQL query I convert them back to a date. This will ensure that you use any indexes that might exist on date fields. As an example:
AND BEGIN_DATE = TO_DATE(${BeginDate}, 'mm-dd-yyyy')
Passing Parameters to Jasper
When running a Jasper Report that requires parameters, Jasper requires the parameters to be placed into a HashMap. I wanted to create a general method for putting the required parameters into the required HashMap format. Knowing that I was going to use View Objects (VO) for the fields on parameter forms, I went ahead and created a generic VO (GeneralReportView) that all parameter form VOs would extend. I added custom code in the VO to rip through all of the attributes and put them into a HashMap thus allowing me to pass them to Jasper. I only need to add one method. Following is the method I added:

Creating View Objects
For each parameter form I am using a VO for all of the necessary parameters. When creating the VO, I am selectings "Rows Populated Programmatically..." and specifying the VO extends my base VO I describe above (GeneralReportView). When creating the attributes, make sure you use the same naming convention as you did when creating the reports. Also, make sure you are using the correct data types. Making sure your names and data type are correct will ensure that when passing them to Jasper as a HashMap they will be resolved correctly and the report will be able to run. The only option I have specified for an attirbute is "Updateable=Always". None of the other options are checked.
Application Flow
When creating an application you must have a flow. JHS will generate a flow, as long as it is data driven such as through parent-child relationships. I knew when running reports, the user would be taking three steps most of time. These steps are:
1) Select the report
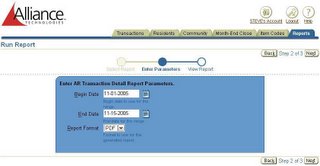
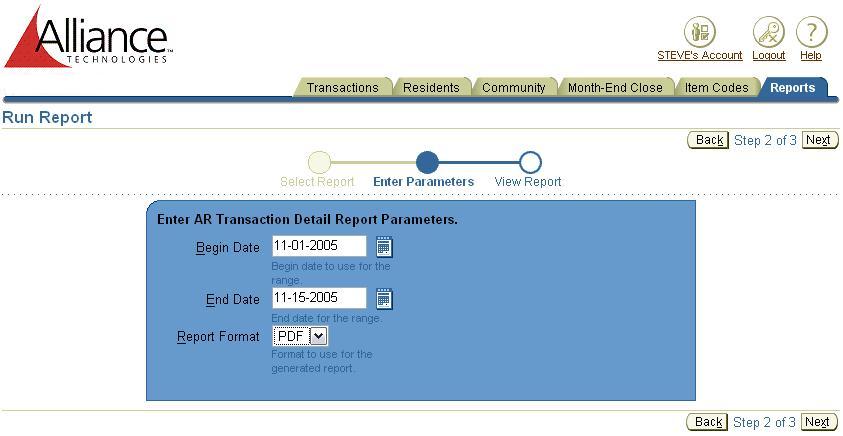
2) Enter parameters
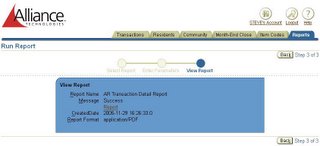
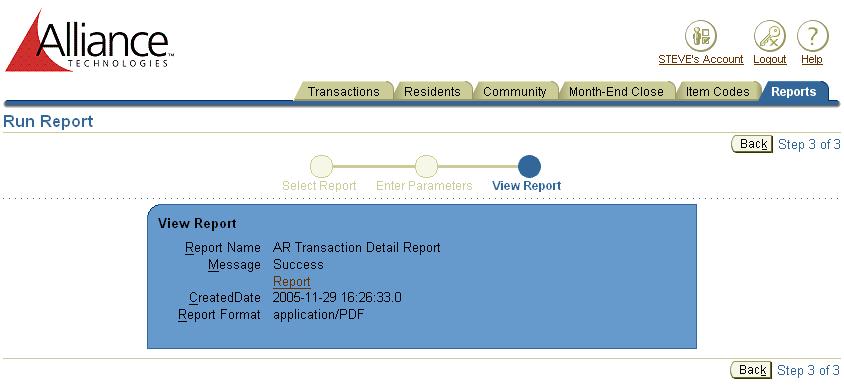
3) View Report
For the most part, when JHS generates a page and you are executing an action on that page, after the action completes you are taken back to the same page. You are not "navigated" to the next one. I had questioned if JHS was going to help but then this blog came to the rescue. What that blog showed me was that using custom templates you could control this. So, I went ahead and modified these same templates to use this wizard type interface. I now use these mofified tempates to generate a page to select the report, enter the parameters, and then finally view the generated report.
There is still some logic that has to be built into the three steps above. Such as, after step 1 the decision needs to be made "what parameter form should be displayed?". Then, after step 2 the decision needs to be made "what report should be generated?". I simply created struts actions to handle my application flow.
Gererate the Paramater Forms
For each unique parameter form, you will need to create a different ViewObject using the steps described above. If you have reports that use the same parameters, you can use the same VO, you just need to generate seperate pages. When creating the VOs, make sure to extend the base VO (GeneralReportView) and then add to your application module so that JHS can see it. In JHS Application Struture file, create a new Base Group based on your VO and using any necessary templates you will be using. Run the application generator and your parameters forms will be created.
Screenshots
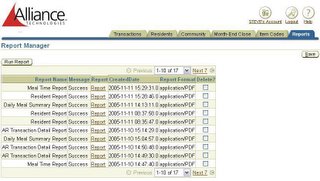
Report Manager - User may view the reports they have executed previously or
select "Run Report" to run a new one.
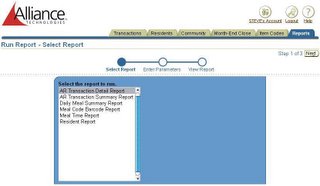
Select Report - User selects the report they want to run.
Enter Parameters - User enters the desired parameters for the report.
View Report - User can see the report that she ran and click on the link
to open it.
I don't have the user interface 100% complete but the functionality is there. Using JHS & Jasper has made it very easy to intergrate reports into our application.
Writing the Reports
We used iReport to create the reports. This tool provides a nice GUI for generating the report files. When creating parameters for your reports, you should use the same naming convention as used by Oracle ADF. As an example, if you have a database column with the name of EMPLOYEE_NAME, ADF would generate the name EmployeeName. Thus, you should name your paramers in Jasper the same way. This will make the ADF components you developed consistent and making passing the parameters to Jasper considerably easier. When you create parameters in Jasper, you need to specify the datatypes. I went ahead and declared all of my dates as String and then in the SQL query I convert them back to a date. This will ensure that you use any indexes that might exist on date fields. As an example:
AND BEGIN_DATE = TO_DATE(${BeginDate}, 'mm-dd-yyyy')
Passing Parameters to Jasper
When running a Jasper Report that requires parameters, Jasper requires the parameters to be placed into a HashMap. I wanted to create a general method for putting the required parameters into the required HashMap format. Knowing that I was going to use View Objects (VO) for the fields on parameter forms, I went ahead and created a generic VO (GeneralReportView) that all parameter form VOs would extend. I added custom code in the VO to rip through all of the attributes and put them into a HashMap thus allowing me to pass them to Jasper. I only need to add one method. Following is the method I added:

Creating View Objects
For each parameter form I am using a VO for all of the necessary parameters. When creating the VO, I am selectings "Rows Populated Programmatically..." and specifying the VO extends my base VO I describe above (GeneralReportView). When creating the attributes, make sure you use the same naming convention as you did when creating the reports. Also, make sure you are using the correct data types. Making sure your names and data type are correct will ensure that when passing them to Jasper as a HashMap they will be resolved correctly and the report will be able to run. The only option I have specified for an attirbute is "Updateable=Always". None of the other options are checked.
Application Flow
When creating an application you must have a flow. JHS will generate a flow, as long as it is data driven such as through parent-child relationships. I knew when running reports, the user would be taking three steps most of time. These steps are:
1) Select the report
2) Enter parameters
3) View Report
For the most part, when JHS generates a page and you are executing an action on that page, after the action completes you are taken back to the same page. You are not "navigated" to the next one. I had questioned if JHS was going to help but then this blog came to the rescue. What that blog showed me was that using custom templates you could control this. So, I went ahead and modified these same templates to use this wizard type interface. I now use these mofified tempates to generate a page to select the report, enter the parameters, and then finally view the generated report.
There is still some logic that has to be built into the three steps above. Such as, after step 1 the decision needs to be made "what parameter form should be displayed?". Then, after step 2 the decision needs to be made "what report should be generated?". I simply created struts actions to handle my application flow.
Gererate the Paramater Forms
For each unique parameter form, you will need to create a different ViewObject using the steps described above. If you have reports that use the same parameters, you can use the same VO, you just need to generate seperate pages. When creating the VOs, make sure to extend the base VO (GeneralReportView) and then add to your application module so that JHS can see it. In JHS Application Struture file, create a new Base Group based on your VO and using any necessary templates you will be using. Run the application generator and your parameters forms will be created.
Report Manager - User may view the reports they have executed previously or
select "Run Report" to run a new one.

Select Report - User selects the report they want to run.

Enter Parameters - User enters the desired parameters for the report.
View Report - User can see the report that she ran and click on the link
to open it.
I don't have the user interface 100% complete but the functionality is there. Using JHS & Jasper has made it very easy to intergrate reports into our application.
Thursday, September 22, 2005
Securing JHeadStart Applications
Securing JHeadStart can be a tricky subject but following a few recent posts you can get this up and running smoothly. In order to get the best security services, you'll want to utilize declaritive J2EE using JAAS. This post will be covering using JDev 10.1.2 and OC4J 10.1.2.
First, you'll need to follow How To Add J2EE Authentication and Authorization to JHeadstart Applications. That will get you setup using the jazn-data.xml for the user's credentials. This works well, but more than likely if you are not using some type of LDAP server for security you are probably acquiring your credentials from a database table (like me). But, you will need to follow these steps to setup security so that it is enabled while you are working with your application in JDeveloper. You want your development environment to as close to the production enviornment as possible .
Once you have that configured, you'll be ready to deploy your app to OC4J. I'm using creditials authorized from a database table as oppposed to the jazn-data.xml file as the user's creditials are always being added, deleted and modified. In order to get this setup, you will want to read Declartive J2EE authentication and authorization with JAAS. It took me several times to get my app running using the login module as described in this paper. I highly recommend making sure you can get the example code working first and understand it before applying to your JHeadStart application.
Before I deploy my application to OC4J, there is one change I am having to make to my web.xml file. Open properties for web.xml and remove Realm from Login Configuration. I remove the text, deploy to OC4J, and then put the line back in there so that it runs in JDev.
Subscribe to:
Posts (Atom)
