Tuesday, November 29, 2005

Confirm Delete with JHeadstart

Before you allow a user to delete a record you may want to prompt the user to verify the delete action before continuing. This confirm delete functionality is not built-in to JHeadstart but can be added with the help of Javascript. If you are wanting this functionality on a form layout, you can look at this thread to see the code changes you need to make. If you are wanting to add this to table layout, I will detail what I did to accomplish this.

When you create a JHeadstart project, many files are automattically added to your project. One of those files is form.js which is a Javascript file. Open this file as it is where we'll be adding our Javascript code. This file is located in /jheadstart directory of the project.

Before I detail the code I added, there is a very helpful tip I found when using this file. If you want to see Javascript debug messages while testing your code, all you need to do is set the debug flag to true in form.js.


var debugMode = true;


Update Form.js

Now, back to the task at hand which is adding confirm delete functionality to your table layout. Add the following code to form.js:


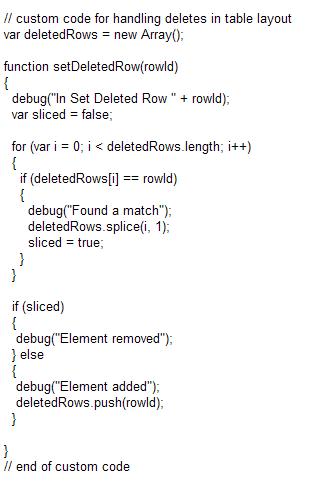
The deletedRows array is used to track what rows have been selected for deletion. The setDeletedRow function is used to add and remove elements from this array. If there is nothing in the array, then the user didn't select anything otherwise we'll know we need to prompt the user.

That is all the changes we need to make to form.js. The other changes we'll need to make directly to our UIX pages. We'll be adding additional Javascript and onClick events to the Save button and checkboxes.

Add Javascript

We'll need to add a Javascript function to the UIX page to handle clicking on the Save button. Following is the code to be added:


Add checkbox onClick event


Select the checkbox in the design editor. Open the property inspector and add the following to the onClick event:

setDeletedRow(${uix.current.PrimaryKeyId});

You'll need to replace PrimaryKeyId with a unique value from your VO. This id is added or removed from the Javascript array and is how the system can determine if at least one row has been checked.

Change Save button

By default, JHeadstart generates a Save button similar to the following:


<submitbutton onclick="verifyDeletedRows();" event="Commit" formname="dataForm" textandaccesskey="${nls.WHATEVER}";>


We'll need to change that so that it calls our Javascript code we added above. Following is the new updated Save buton:


<button onclick="return verifyDeletedRows();" textandaccesskey="${nls.WHATEVER}">
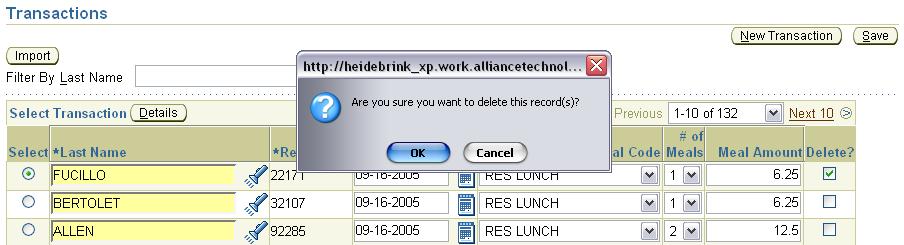
Run the app

After you get those steps completed successfully, you should see something like this when you execute your program:


Last note, make sure to follow this to ensure you document your post generation changes so that you can continue to generate your app. You can also specify at a page level in JHS which page(s) for the generator to ignore.

Partial Page Rendering using JHeadstart and UIX

I am currently working on a project that requires an amount field to be calculated based upon values set by the user. In this particular instance, there is a type field, quantity field, and an amount field. Based on what the user selects for type and quantity, I needed the amount to automatically be calculated by the system. Additionally, I needed to allow the user to override this calculated value if necessary.

As the user makes changes to either the type or quantity field, I also wanted the system to perform the update without refreshing the entire page as this is a web application. I wanted this calculation to happen in either table layout or form layout. I was able to meet all of these requirements using JHeadstart and Partial Page Rendering functionality in JDeveloper.

Following are "partial" steps to set this up. I say partial because these steps are only if you are needing the change to fire based on one field change instead of two (as in my scenario). I have also created an example based upon the SCOTT schema that I can send anyone. Drop me a line at heidebrinks@alliancechnologies.net and I'll send it to you.

All of these steps are completed AFTER your application has been generated using JHeadstart 10.1.2.

  1. Create a new struts action that extends JhsDataAction and add a method to handle the event.

  2. public void onWhenValChanged(DataActionContext ctx) {
    }

  3. We'll want this struts action to work for both table and form layout. Add code to this method to grab the currently "changed" row. The "layoutType" and "rowIndex" parameters we'll be setting in a later step.

  4. public void onWhenValChanged(DataActionContext ctx) {

    // layout type will determine how we access the row
    String layoutTypeParam = ctx.getHttpServletRequest().getParameter("layoutType");

    Row row;

    if (layoutTypeParam.equalsIgnoreCase("T")) {
    // since this is table layout, we need to get the row index to know which one
    String rowIndexParam = ctx.getHttpServletRequest().getParameter("rowIndex");
    row = ctx.getBindingContainer()
    .findIteratorBinding("EmpIterator")
    .getNavigatableRowIterator().getRowAtRangeIndex(Integer.parseInt(
    rowIndexParam));
    } else {
    row = ctx.getBindingContainer()
    .findIteratorBinding("EmpIterator")
    .getNavigatableRowIterator().getCurrentRow();
    }
    }


  5. Add code to the "onWhenValChanged" method to execute the necessary business rule(s). This code is best maintained in the business services layer and simply called from here.
  6. Open the UIX page that is in form layout. Using the design editor, select the field you are wanting to fire the change. With the field selected, open the Property Inspector and select "primaryClientAction". The following image is an example. Notice the use of the "layoutType" parameter. Set this to "F" to indicate form. The "Action Event" property is set to "whenValChanged" which will call our method "onWhenValChanged" in the JhsDataAction we created.


  7. Open the UIX page that is in table layout. Using the design editor, select the field you are wanting to fire the change. With the field selected, open the Property Inspector and select "primaryClientAction". The following image is an example. Notice the use of "layoutType" and "rowIndex" parameter. The "rowIndex" parameter is used by the JhsDataAction to determine which row is being changed by the user in the table layout.


  8. For the page that is in table layout ONLY, open the source editor. Update multiRowUpdateEvent to include the new event you are creating.

    formValue name="multiRowUpdateEvent"
    value="whenValChanged"


  9. Update struts config so that both actions for the form and table use the new JhsDataAction.


Just let me know if you want the example application I developed. It should be helpful if you are trying to implement similar functionality.