Wednesday, November 05, 2008

AquaLogic - How to fetch records from the database into a select

Often times on JSP pages within our ALBPM projects we want to display a select list with a list of values loaded from a database.  Hopefully this quick tutorial will get you started in the right direction.


Prerequisites


BEA AquaLogic BPM Studio 6.0.4 (Will also work on previous versions)


Create instance variable for the array


Load array from database


Create an "Automatic" component on your screenflow and add code similar to the following in order to load the array defined above.


params[0] = "STATES"  //local var defined as String[]


for each row in executeQuery(DynamicSQL, sentence : "select text,value from lookups where lookup_name = ?",

    implname : "YOUR DB", inParameters : params) do

            statesList[String(row["text"])] = String(row["value"])

end


// You could also use "inParameters : ["STATES]" and save yourself from defining the params local variable.


Pass array into JSP


Place an "Interactive Component Call" on your screenflow.  Double-click on your component so the "Main Task" editor appears.  Select "BPM Object Interactive Call" and select your object variable and JSP.  You must then select "Argument Mapping" in order to pass your array into the JSP.


Create the select on the JSP page


Here is some example code I use in my JSP to display the data from the array in the select box:


Next Steps


Hopefully this quick tutorial will help you accomplish what you need.  I did leave out some details as I'm assuing you have at least a little ALBPM experience.  If you need more info or have any problems please let me know.


Thursday, November 29, 2007

AJAX Simplified: JDeveloper and Enterprise JavaBeans (EJB)

When developing rich internet applications (RIA) for our hosted applications and applications I have developed for clients I have generally used Spring, JDBC, DWR, JavaScript and DOJO. For my next development project I am toying with replacing JDBC with EJB. JDeveloper is very intuitive in creating EJB models and the wizards within the tool speed up development. In this post I'm simply going to be talking about hooking up DWR with EJBs.

If you are not familiar with creating EJBs in JDeveloper start with this tutorial. I will only be covering setting up your web project to expose your EJB methods. The web project that is built in this post is based off of the EJB project created in the tutorial.

Prerequisites

JDeveloper 10.1.3

DWR 1.4

Oracle DB

Create web project and configure properties

Create a new WebProject within the same workspace as your EJB model project. As you go through the "Web Project Wizard" select to create a new JSP page. After you have completed the wizard double-click on your project and select Dependencies. Make sure your EJB project is selected. With the project properties still open select Libaries. Add new libraries so that they look similar to the following:

Notice the Dwr.jar entry. Download the jar from here and save into /WEB-INF/lib directory. You might have to create that directory.

HINT: You can expedite the above without having to manually configure your web project. I started by creating a web project first. I then went into my EJB Model project, right-clicked on my Session bean and selected "New Simple Java Client". I used the wizard to create the Java client in my already created web project. This automattically configured my project with the exception of adding dwr.jar.

Create a Service Class

The service class will be used to expose our Java methods to DWR. DWR will inspect this class and expose our methods using JavaScript. I will not be covering JavaScript in this post.

Create a new Java class in your WebProject. Following is the code I have in this class:

package dwr.service;

import dwr.buslogic.Employees;
import dwr.buslogic.SessionEJBFacade;

import dwr.client.SessionEJBFacadeClient;

import java.util.List;

import javax.naming.Context;
import javax.naming.InitialContext;
import javax.naming.NamingException;

import org.apache.commons.logging.Log;
import org.apache.commons.logging.LogFactory;

public class HRService {
static Log log = LogFactory.getLog(HRService.class);
private Context context;

/**
* When this class is instatiated we'll want to get our context for
* looking up our beans
*/
public HRService() {
log.debug("Service instatiating....");
try {
context = getInitialContext();
} catch (NamingException ne) {
log.fatal(ne);
}
}

/**
* Return all employees
*/
public List<Employees> getEmployees() throws NamingException {

log.debug("getEmployees");

// lookup our session bean
SessionEJBFacade sessionEJBFacade =
(SessionEJBFacade)context.lookup("SessionEJBFacade");

return sessionEJBFacade.queryEmployeesFindAll();
}

/**
* Return a single employee based on their employee id
*/
public List<Employees> getEmployee(long empid) throws NamingException {
log.debug("getEmployee(empid=" + empid + ")");
SessionEJBFacade sessionEJBFacade =
(SessionEJBFacade)context.lookup("SessionEJBFacade");
return sessionEJBFacade.queryEmployeesFindById(empid);
}

/**
* Create our context
*/
private static Context getInitialContext() throws NamingException {
// Get InitialContext for Embedded OC4J
// The embedded server must be running for lookups to succeed.
return new InitialContext();
}
}

Configuring DWR

In order for DWR to work we must create a dwr.xml file. This file needs to be in the same location as web.xml. Within your WebProject expand /WEB-INF folder and create a new xml file named dwr.xml. Following is what I have in my dwr.xml to expose the Java class created above:

<!DOCTYPE dwr PUBLIC "-//GetAhead Limited//DTD Direct Web Remoting 2.0//EN" "http://getahead.org/dwr//dwr20.dtd">
<dwr>
<allow>
<create creator="new" javascript="HRService">
<param name="class" value="dwr.service.HRService"/>
</create>
<convert converter="bean" match="dwr.buslogic.Employees">
<param name="include" value="firstName,lastName"/>
</convert>
</allow>
</dwr>

The <create> element is telling DWR what class we want to have exposed via JavaScript. By default we are going to have DWR inspect our class and expose all available public methods. We could specify specific methods if we would like to.

The <convert> element ensures all of our parameters are converted properly by DWR. The class "dwr.buslogic.Employees" is the class that was created for me in my EJB Model project. I am also specifying that I only want firstName and lastName attributes exposed.

Configure web.xml

Your web.xml file must be configured to run the DWR servlet. See the following for an example:

<?xml version = '1.0' encoding = 'windows-1252'?>
<web-app xmlns:xsi="
http://www.w3.org/2001/XMLSchema-instance" xsi:schemaLocation="http://java.sun.com/xml/ns/j2ee http://java.sun.com/xml/ns/j2ee/web-app_2_4.xsd" version="2.4" xmlns="http://java.sun.com/xml/ns/j2ee">
<description>Empty web.xml file for Web Application</description>
<session-config>
<session-timeout>35</session-timeout>
</session-config>
<mime-mapping>
<extension>html</extension>
<mime-type>text/html</mime-type>
</mime-mapping>
<mime-mapping>
<extension>txt</extension>
<mime-type>text/plain</mime-type>
</mime-mapping>
<servlet>
<servlet-name>dwr-invoker</servlet-name>
<servlet-class>uk.ltd.getahead.dwr.DWRServlet</servlet-class>
<init-param>
<param-name>debug</param-name>
<param-value>true</param-value>
</init-param>
</servlet>
<servlet-mapping>
<servlet-name>dwr-invoker</servlet-name>
<url-pattern>/dwr/*</url-pattern>
</servlet-mapping>
</web-app>

Project Make-up

For a simple reference following is a screen shot of the Application Navigator in JDeveloper:

Ready to Run

If you want to put some text on your JSP page you created you can but there is no reason. Simply right click on your JSP page and select run. Once the application starts, your JSP page will appear. In the address bar change your location so that you go to /dwr/ (back out the name of your jsp page) and you'll see something similar to the following:

Test DWR

The DWR page will display the class(es) that are known to DWR. Click on the link and you'll see a list of all of the methods that have been exposed. This page makes it very easy to test your DWR methods without having to write any code. Eventually when you are ready to move your application to production you'll want to turn this page "off". You can do this by updating your web.xml.

Click on the methods from your class to make sure they work:

JavaScript Primer

If you view the source from the DWR test page you'll see the very small amount of JavaScript required to display the data. Here is the code from the getEmployees() button on my page:

<input class='ibutton' type='button' onclick='HRService.getEmployees(reply0);' value='Execute' title='Calls HRService.getEmployees(). View source for details.'/>
<script type='text/javascript'>
var reply0 = function(data)
{
if (data != null && typeof data == 'object') alert(dwr.util.toDescriptiveString(data, 2));
else dwr.util.setValue('d0', dwr.util.toDescriptiveString(data, 1));
}
</script>

Next Steps

For now I didn't get into details regarding how I code JavaScript to interface with DWR. I will cover that in a subsequent post. But for now you should be able to see how easy it was for me to create EJBs in JDeveloper and expose them to my browser.

Email me if you would like me to send you this project from JDeveloper.
Thursday, January 26, 2006

Developing Rich Internet Applications (RIA) with JDeveloper

If you're like me, you miss the days of developing client-server applications with thick clients where the user interfaces could interact better with the user. Those clients were feature rich and very intuitive. Then, along came the internet computing model. Maintainability is significantly easier with this model but user interfaces seemed to have taken a step backwards. Often times, as a consultant, I visit client sites where they complain about the dreaded refresh issue. The one where the entire page has to be refreshed. I currenly handle this issue myself using AJAX but I am constantly looking for other alternatives. I am now working with the rich internet technologies from Laszlo.

Installing this software is a snap. In about 10 minutes you should have the software downloaded, installed and you are up and running. Once this is completed all of the docs and examples are installed as well and assessible on the machine where you installed it. Laszlo by default will install using Tomcat.

As an application implementer, I am always writing applications that interact with a database. According to documentation on Laszlo's site, they state:

Laszlo was built from the ground up to facilitate the development of data-driven applications.

That statement alone has me intrigued, as that is exactly the type of apps I develop. The way Laszlo does interact with data is by using XML and XPATH.

Now, off to development using JDeveloper as my IDE. You can quickly create your first data-driven Laszlo application after you get your JDeveloper environment configured (see below for steps). Since Laszlo expects data to be in XML format, the two technologies I like to use are ADF and XSQL Servlet.

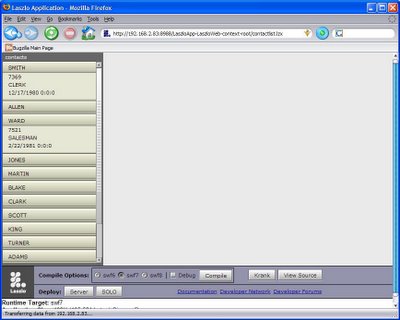
Following is a screenshot of a very basic Laszlo application. I modified one of the demos and changed from using a static XML dataset to using a dataset derived from an Oracle database. In this particular instance, I am using an XSQL Servlet to query the scott.emp table.

Clicking on the buttons with the names will automattically expand or collapse the contact information. (no refresh!)

I do feel there are some risks with using this technology. The biggest one is that this technology relies on Flash technology for the user interface. Now, you can use the built-in components for building UIs, but if you wanted to start adding your own custom components you are going to need a licensed version of Flash. The users of your applications will also need to have the Flash 6 plugin installed, although I have heard that 99% of all users already have this.

Steps to configuring JDeveloper to build Laszlo Applications:

1. Follow these Laszlo instructions and don't skip these.
2. Setup JDeveloper so that it recognizes the .LZX extension as an XML File
a. Tools > Preferences > File Types
b. Add a file type and associate it with XML Document.
3. Download a local copy of the lzx.dtd file. This will allow you to have code insight.
4. Add something similar to the following into your .lzx so that you can use code insight.
<!DOCTYPE canvas SYSTEM "lzx.dtd">

Tuesday, January 10, 2006

JDeveloper, Time for a Name Change?

I've been using JDeveloper for a long time, even since it's inception. If I remember correctly, Oracle developed it then started using Borland's JBuilder and then finally completely rewrote everything themselves. I wish I would have kept some of those first builds, it would be nice to go back and look at the changes.

I think the software has always been called JDeveloper. The name fit the first builds of this software as it was for Java Developers. As we all know, JDeveloper has evolved and now includes a large range of features. JDeveloper can now be productively used by developers, software architects, data architects, requirements specifiers and more. The tool can even be used for additional languages such as PL/SQL and PHP.

Since the name "JDeveloper" no longer fits, I personally think there should be a name change. There is another IDE out there named Eclipse. I'm not sure why it is called that, maybe because it is supposed to "eclipse" all other tools out there. I think it is called that because I was in complete darkness trying to get productive in the tool. There are also IDE's named Net Beans, JBuilder, and others.

All of the Oracle tools are generally named according to their functionality. Forms, for developing GUI forms applications. Reports, for writing reports. But JDeveloper one would think was only for Java Developers.

I'm not sure what the new name should be. The big word at Oracle right now is Fusion. Fusion means "An occurrence that involves the production of a union". Maybe Fusion is a better name as JDeveloper combines several technologies and makes you productive. At least this name isn't misleading like JDeveloper.

Friday, January 06, 2006

JDeveloper & UML Modeling in a Team

One of the tasks high on my todo list is figuring out how to best leverage JDeveloper modeling capapbilities within our team. Our team, like many, consists of members playing different roles within the application development projects. The primary members that will be using the modeling capapbilities are architects, data modelers, system analysts, and implementers. I believe I have so far came up with a fairly good approach although I still have a ways to go yet in getting all of the kinks worked out.

When using the modeling tool, I want the architect to be able to oversee everything. I want the data modeler to only care about the data model. I want the system analysts to only worry about the requirements they are gathering. Finally, the implementers are responsible for all of the implementation components they are going to build to realize the requirements.

In order to achieve this, I have been creating seperate projects for these different roles. I have been putting all of these projects in the same workspace although I never put the workspace in source control. I simply make sure all team members at a minimum have the basic directory structure the same.

The data modeling project, contains all of the database objects. This obviously includes tables, views, sequences, etc.

The analysis project, contains all of the use cases and activity diagrams as gathered by the analysts.

The design project, contains class, sequence and activity diagrams.

The architecture proejct, "sits" on top of all of these projects. You can accomplish this by adding the models of all of the before mentioned projects by editing the project properties. Once you add those models, all you need if you are the architect is to have one project and you'll be able to see everything.

Projects always start with the architecture project and include at minimum the logical view. This logical view is basically a package diagram laying out how the software will be organized (layered). In the future, as Oracle adds more diagrams, this project will include Network, Process, and Deployment views.

The architect can also use the Javadoc capabilities to stand on the project and create a majority of the documentation for the project.

I am hoping someday that software requirement specifications, design specifications and softare architecture documents can all be derived straight out of JDeveloper instead of creating seperate docs. Maybe someday...

Sunday, December 11, 2005

JDeveloper 10.1.3 EA

I have been getting a lot of use out of the new version of JDeveloper 10.1.3. So far I feel Oracle has achieved their goals of improving the IDE and beef up refactoring and modeling capabilities. As someone who generally stays away from non-production releases, I have found myself using both 10.1.2 and 10.1.3.

I have always struggled with the modeling features in 10.1.2. They just didn't seem to perform everything I wanted them to do. I am now using the modeling features of 10.1.3 to get past many of the limitations I was seeing. I still have all of my production code in version 10.1.2 but my diagrams are in 10.1.3. I am accomplishing this by setting path settings in my 10.1.3 modeling project to include the source paths of my 10.1.2 model, view and testing projects.

As mentioned, I have a model, view and test project in 10.1.2. This is the actual code that will be deployed to our production servers. My directory structure looks simiar to the following:

c:\projects\MyProject
c:\projects\MyProject\Model
c:\projects\MyProject\ViewController
c:\projects\MyProject\Test

In c:\projects\MyProject resides my workspace file for the 10.1.2 projects. I have also created another workspace in c:\projects\MyProject that is used by 10.1.3. I have created a project named ArchitectureDiagrams in the directory:

c:\projects\MyProject\ArchitectureDiagrams

In my ArchitectureDiagrams project (10.1.3), I open the project settings and add the model, view, and test project source paths to the Java Content settings. After I have done that, JDeveloper 10.1.3 with it's dynamic directory structures automattically pulls in the files from the other projects.

Once I have completed these steps, I can start leveraging 10.1.3 features. Specifically, I am creating use-case and activity diagrams. I am creating class diagrams by simplying dragging and dropping classes onto the diagram. This is great help in keeping my diagrams in sync with my code. Finally, I can also actually open the java files that I created in 10.1.2 and use the additional features of 10.1.3 such as refactoring and code development features.

I do swap between the two different version of JDeveloper and whenever I make a change to a java file in 10.1.3, I make sure the code is still working as I will be deploying and testing using JDeveloper 10.1.2. This approach has allowed me to use the new features of JDeveloper and not lock me into using a tool that is not production release. Although I really don't want to loose my diagrams, I at least will be able to always get support for my production code in case I need it.

Tuesday, November 29, 2005

Confirm Delete with JHeadstart

Before you allow a user to delete a record you may want to prompt the user to verify the delete action before continuing. This confirm delete functionality is not built-in to JHeadstart but can be added with the help of Javascript. If you are wanting this functionality on a form layout, you can look at this thread to see the code changes you need to make. If you are wanting to add this to table layout, I will detail what I did to accomplish this.

When you create a JHeadstart project, many files are automattically added to your project. One of those files is form.js which is a Javascript file. Open this file as it is where we'll be adding our Javascript code. This file is located in /jheadstart directory of the project.

Before I detail the code I added, there is a very helpful tip I found when using this file. If you want to see Javascript debug messages while testing your code, all you need to do is set the debug flag to true in form.js.


var debugMode = true;


Update Form.js

Now, back to the task at hand which is adding confirm delete functionality to your table layout. Add the following code to form.js:


The deletedRows array is used to track what rows have been selected for deletion. The setDeletedRow function is used to add and remove elements from this array. If there is nothing in the array, then the user didn't select anything otherwise we'll know we need to prompt the user.

That is all the changes we need to make to form.js. The other changes we'll need to make directly to our UIX pages. We'll be adding additional Javascript and onClick events to the Save button and checkboxes.

Add Javascript

We'll need to add a Javascript function to the UIX page to handle clicking on the Save button. Following is the code to be added:


Add checkbox onClick event


Select the checkbox in the design editor. Open the property inspector and add the following to the onClick event:

setDeletedRow(${uix.current.PrimaryKeyId});

You'll need to replace PrimaryKeyId with a unique value from your VO. This id is added or removed from the Javascript array and is how the system can determine if at least one row has been checked.

Change Save button

By default, JHeadstart generates a Save button similar to the following:


<submitbutton onclick="verifyDeletedRows();" event="Commit" formname="dataForm" textandaccesskey="${nls.WHATEVER}";>


We'll need to change that so that it calls our Javascript code we added above. Following is the new updated Save buton:


<button onclick="return verifyDeletedRows();" textandaccesskey="${nls.WHATEVER}">

Run the app

After you get those steps completed successfully, you should see something like this when you execute your program:


Last note, make sure to follow this to ensure you document your post generation changes so that you can continue to generate your app. You can also specify at a page level in JHS which page(s) for the generator to ignore.

Partial Page Rendering using JHeadstart and UIX

I am currently working on a project that requires an amount field to be calculated based upon values set by the user. In this particular instance, there is a type field, quantity field, and an amount field. Based on what the user selects for type and quantity, I needed the amount to automatically be calculated by the system. Additionally, I needed to allow the user to override this calculated value if necessary.

As the user makes changes to either the type or quantity field, I also wanted the system to perform the update without refreshing the entire page as this is a web application. I wanted this calculation to happen in either table layout or form layout. I was able to meet all of these requirements using JHeadstart and Partial Page Rendering functionality in JDeveloper.

Following are "partial" steps to set this up. I say partial because these steps are only if you are needing the change to fire based on one field change instead of two (as in my scenario). I have also created an example based upon the SCOTT schema that I can send anyone. Drop me a line at heidebrinks@alliancechnologies.net and I'll send it to you.

All of these steps are completed AFTER your application has been generated using JHeadstart 10.1.2.

  1. Create a new struts action that extends JhsDataAction and add a method to handle the event.

  2. public void onWhenValChanged(DataActionContext ctx) {
    }

  3. We'll want this struts action to work for both table and form layout. Add code to this method to grab the currently "changed" row. The "layoutType" and "rowIndex" parameters we'll be setting in a later step.

  4. public void onWhenValChanged(DataActionContext ctx) {

    // layout type will determine how we access the row
    String layoutTypeParam = ctx.getHttpServletRequest().getParameter("layoutType");

    Row row;

    if (layoutTypeParam.equalsIgnoreCase("T")) {
    // since this is table layout, we need to get the row index to know which one
    String rowIndexParam = ctx.getHttpServletRequest().getParameter("rowIndex");
    row = ctx.getBindingContainer()
    .findIteratorBinding("EmpIterator")
    .getNavigatableRowIterator().getRowAtRangeIndex(Integer.parseInt(
    rowIndexParam));
    } else {
    row = ctx.getBindingContainer()
    .findIteratorBinding("EmpIterator")
    .getNavigatableRowIterator().getCurrentRow();
    }
    }


  5. Add code to the "onWhenValChanged" method to execute the necessary business rule(s). This code is best maintained in the business services layer and simply called from here.
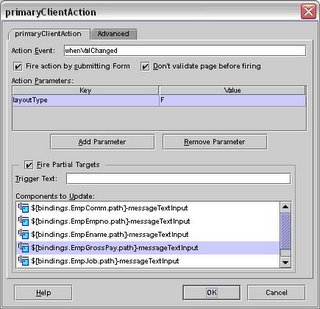
  6. Open the UIX page that is in form layout. Using the design editor, select the field you are wanting to fire the change. With the field selected, open the Property Inspector and select "primaryClientAction". The following image is an example. Notice the use of the "layoutType" parameter. Set this to "F" to indicate form. The "Action Event" property is set to "whenValChanged" which will call our method "onWhenValChanged" in the JhsDataAction we created.


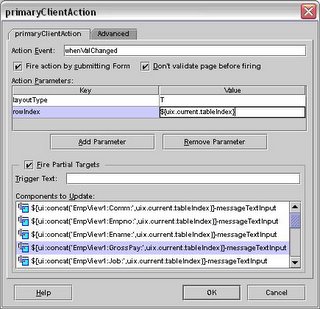
  7. Open the UIX page that is in table layout. Using the design editor, select the field you are wanting to fire the change. With the field selected, open the Property Inspector and select "primaryClientAction". The following image is an example. Notice the use of "layoutType" and "rowIndex" parameter. The "rowIndex" parameter is used by the JhsDataAction to determine which row is being changed by the user in the table layout.


  8. For the page that is in table layout ONLY, open the source editor. Update multiRowUpdateEvent to include the new event you are creating.

    formValue name="multiRowUpdateEvent"
    value="whenValChanged"


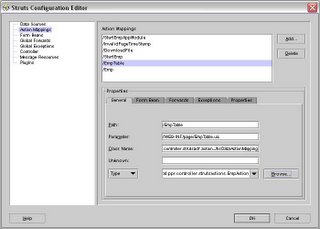
  9. Update struts config so that both actions for the form and table use the new JhsDataAction.


Just let me know if you want the example application I developed. It should be helpful if you are trying to implement similar functionality.